[Robotics][Proj 17] semantic segmentation 예제 연습
데이터 셋 : ADE20K
먼저 데이터 셋을 준비 하자
데이터 셋
ADE20k를 사용하려면
먼저 공식 사이트에 가입을 해야 한다
http://groups.csail.mit.edu/vision/datasets/ADE20K/request_data/
ADE20K
groups.csail.mit.edu


메일 올 때까지 기다려 달라고 한다
Affiliation에는 지금 소속되어 있고 프로젝트를 진행할 기관인 Korea Institute of Science and Technology를 적었다
그러고 메일을 보면

이렇게 링크를 보내준다
URL을 누르고 로그인을 해주면 아래의 창이 뜬다

이러면

다운로드를 받을 수 있다

대충 7.7GB 정도 된다
하나를 샘플로 열어보면

잘 가져와 졌다
다음 사이트에서 Starter_code를 볼 수 있다
https://github.com/CSAILVision/ADE20K/blob/main/notebooks/ade20k_starter.ipynb
GitHub - CSAILVision/ADE20K: ADE20K Dataset
ADE20K Dataset. Contribute to CSAILVision/ADE20K development by creating an account on GitHub.
github.com
깃허브를 다운받아 주고
https://github.com/CSAILVision/ADE20K/tree/main

원래있던 dataset을 sample_dataset으로 그리고 다운 받은 데이터셋을 dataset 폴더를 만들어서 넣어줬다
우분투 / MAC 모두 ade20k_starter.ipynb 를 실행해 봤는데
맥북의 경우는 가상환경을 다음과 같이 만들었다
pyenv install 3.8.11
pyenv virtualenv 3.8.11 seg

cd ~/Documents/seg_project/ADE20k
pyenv local seg
python -m ipykernel install --user --name seg --display-name "seg"
로 pyenv를 통해 ADE20k 디렉토리에 seg가상환경을 적용시켰다
Error shooting
Mac 에서 다음 코드
! sh setup.sh를 실행시켰을 때
setup.sh: line 4: wget: command not found
다음과 같은 오류가 나는 경우가 있다
이 경우는 그냥 단순히 wget 패키지가 없어서 HTTP주소를 가져올 수 없다(?)이런 식으로 해석하면 될 것 같다
해결방법은 다음과 같다
brew install wget그냥 다운받으면 해결된다

Error shooting
cannot import name 'utils_ade20k' from 'utils' (/home/kist/anaconda3/envs/seg/lib/python3.8/site-packages/utils/__init__.py)
이거는 우리가 utils_ade20K를 다운 받은거지 패키지와 되어서 python3.8디렉토리에 들어간 것이 아니다
동일 경로 : 단순 import
하위 경로 : from <PATH> import <FILE>
상위 경로/다른 경로 : sys.path.append('PATH')
먼저 연습에 필요한 가상환경을 만들어주자
(본격적인 프로젝트가 아니므로 편의를 위해서 conda를 사용했다)
conda create -n seg python=3.8
conda activate seg
다음 사이트를 참고하였다 (hugging Face)
https://huggingface.co/docs/datasets/semantic_segmentation
Semantic segmentation
huggingface.co
먼저 필요한 라이브러리를 다운 받아 보자
pip install -U albumentations opencv-python
Albumentations is a Python library for performing data augmentation for computer vision. It supports various computer vision tasks such as image classification, object detection, segmentation, and keypoint estimation.
albumentations 는 데이터 증강에 필요한 라이브러리라고 한다
사용한 데이터 셋은 scene_parse_150이다
https://huggingface.co/datasets/scene_parse_150
scene_parse_150 · Datasets at Hugging Face
Dataset Card for MIT Scene Parsing Benchmark Dataset Summary Scene parsing is the task of segmenting and parsing an image into different image regions associated with semantic categories, such as sky, road, person, and bed. MIT Scene Parsing Benchmark (Sce
huggingface.co

이런식으로 가구등에 annotation되어 있는 데이터 셋이다
위에 Subset의 instance_segmentation을 scene_parse로 바꿔보면

이렇게 annotation과 labeling이 되어 있는 것을 볼 수 있다
Scene parsing is the task of segmenting and parsing an image into different image regions associated with semantic categories, such as sky, road, person, and bed. MIT Scene Parsing Benchmark (SceneParse150) provides a standard training and evaluation platform for the algorithms of scene parsing. The data for this benchmark comes from ADE20K Dataset which contains more than 20K scene-centric images exhaustively annotated with objects and object parts. Specifically, the benchmark is divided into 20K images for training, 2K images for validation, and another batch of held-out images for testing. There are in total 150 semantic categories included for evaluation, which include e.g. sky, road, grass, and discrete objects like person, car, bed. Note that there are non-uniform distribution of objects occuring in the images, mimicking a more natural object occurrence in daily scene.
This guide uses the Scene Parsing dataset for segmenting and parsing an image into different image regions associated with semantic categories, such as sky, road, person, and bed.
위와 같은 것을 구분해준다고 한다
이 데이터셋을 사용하려면 (Hugging Face Dataset)
https://github.com/huggingface/datasets
GitHub - huggingface/datasets: 🤗 The largest hub of ready-to-use datasets for ML models with fast, easy-to-use and efficient
🤗 The largest hub of ready-to-use datasets for ML models with fast, easy-to-use and efficient data manipulation tools - GitHub - huggingface/datasets: 🤗 The largest hub of ready-to-use datasets for...
github.com
여기에 들어가서 readme.md를 참고하면 될 것 같다
pip install datasets
conda install -c huggingface -c conda-forge datasets
참고로 이 datasets 패키지도 일종의 라이브러리이기 때문에 버전이 존재한다

테스트를 위해서 다음 코드를 실행해보면
from datasets import load_dataset

dataset = load_dataset("scene_parse_150", split="train")
index = 10
print(dataset[index])
print(dataset[index]["image"])
데이터셋이 다운로드가 된다
dataset[index]를 출력해보면
{'image': <PIL.JpegImagePlugin.JpegImageFile image mode=RGB size=683x512 at 0x7FB37B0EC810>, 'annotation': <PIL.PngImagePlugin.PngImageFile image mode=L size=683x512 at 0x7FB37B0EC9D0>, 'scene_category': 927}
이런 식으로 나오는데 이는
image: a PIL image object.
annotation: segmentation mask of the image.
scene_category: the label or scene category of the image (like “kitchen” or “office”).
를 의미한다
가시화를 위해
pip install matplotlib를 받아주고
밑에 링크에 들어가서
create_ade20k_label_colormap() 부분을 복사해서 넣어주자
(물론 프로젝트에서는 clone을 하고 .py 하나를 만들어서 class 단위로 놀아주면 될 듯 하다)
We can also add a color palette on the segmentation mask and overlay it on top of the original image to visualize the dataset:
def create_ade20k_label_colormap():
  """Creates a label colormap used in ADE20K segmentation benchmark.
  Returns:
    A colormap for visualizing segmentation results.
  """
  return np.asarray([
      [0, 0, 0],
      ...
      ...
      ...
      ...
      [102, 255, 0],
      [92, 0, 255],
  ])
그냥 단순히 rqb color를 지정해 준다고 생각하면 된다
이렇게 한 다음 아래의 코드를 실행시켜주자
from datasets import load_dataset
import matplotlib.pyplot as plt
import numpy as np
import albumentations


def visualize_seg_mask(image: np.ndarray, mask: np.ndarray):
   color_seg = np.zeros((mask.shape[0], mask.shape[1], 3), dtype=np.uint8)
   palette = np.array(create_ade20k_label_colormap())
   for label, color in enumerate(palette):
       color_seg[mask == label, :] = color
   color_seg = color_seg[..., ::-1]  # convert to BGR

   img = np.array(image) * 0.5 + color_seg * 0.5  # plot the image with the segmentation map
   img = img.astype(np.uint8)

   plt.figure(figsize=(15, 10))
   plt.imshow(img)
   plt.axis("off")
   plt.show()


dataset = load_dataset("scene_parse_150", split="train")
index = 10


visualize_seg_mask(
    np.array(dataset[index]["image"]),
    np.array(dataset[index]["annotation"])
)
주의할 것은 위의 사진은 segmentation을 진행한 사진이 아닌
단순히 image와 annnotation을 overlay 시킨 사진이다
그 다음엔 이미지 증강을 해보자
import albumentations

transform = albumentations.Compose(
    [
        albumentations.Resize(256, 256),
        albumentations.RandomBrightnessContrast(brightness_limit=0.3, contrast_limit=0.3, p=0.5),
    #단순히 밝기를 키워줌
    ]
)

def transforms(examples):
    transformed_images, transformed_masks = [], []
    for image, seg_mask in zip(examples["image"], examples["annotation"]):
        image, seg_mask = np.array(image), np.array(seg_mask)
        transformed = transform(image=image, mask=seg_mask)
        transformed_images.append(transformed["image"])
        transformed_masks.append(transformed["mask"])
    examples["pixel_values"] = transformed_images
    examples["label"] = transformed_masks
    return examples
이렇게 만든 것을 적용을 하려면 set_transform을 이용하면 된다

dataset.set_transform(transforms)
image = np.array(dataset[index]["pixel_values"])
mask = np.array(dataset[index]["label"])

visualize_seg_mask(image, mask)
를 진행하면

이미지가 바뀐 것을 확인 할 수 있다
다음과 같이 torchvision을 이용해서 증강을 진행할 수도 있다
(만약 torchvision이 없다면 일단 넘어가자)
from torchvision.transforms import Resize, ColorJitter, Compose

transformation_chain = Compose([
    Resize((256, 256)),
    ColorJitter(brightness=0.25, contrast=0.25, saturation=0.25, hue=0.1)
])
resize = Resize((256, 256))

def train_transforms(example_batch):
    example_batch["pixel_values"] = [transformation_chain(x) for x in example_batch["image"]]
    example_batch["label"] = [resize(x) for x in example_batch["annotation"]]
    return example_batch

dataset.set_transform(train_transforms)

image = np.array(dataset[index]["pixel_values"])
mask = np.array(dataset[index]["label"])

visualize_seg_mask(image, mask)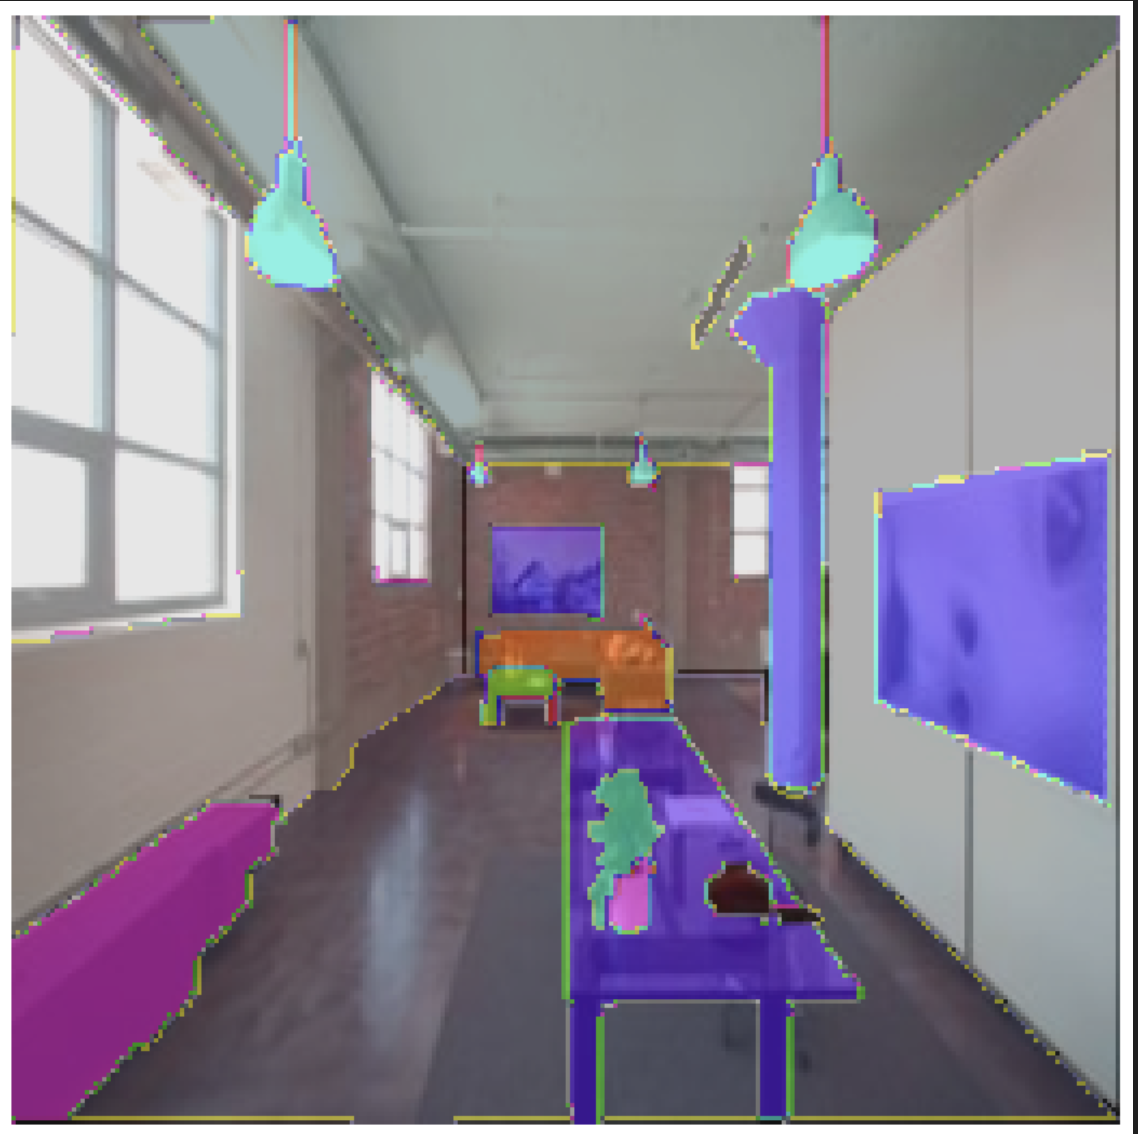
이제 segmentation을 진행 할 것인데
pytorch 가 있어야 한다
자신의 버전에 맞는 pytorch 설치 방법은
PyTorch
An open source machine learning framework that accelerates the path from research prototyping to production deployment.
pytorch.org
여기에서 볼 수 있고

만약 본인의 CUDA 버전을 모르면
nvidia-smi를 통해 확인할 수 있지만 이것은 가장 높은 버전만 보여주므로
아래의 명령어를 실행시킨다
ls /usr/local |grep cuda
만약 여기에 안뜨거나 위에 있는 pytorch가 지원하는 CUDA버전이 아닌경우
아래의 포스팅에서 설정할 수 있다
우분투 20.04에서 Pytorch 설치
< NVIDIA 그래픽 드라이버 설치 > 그래픽 카드로 드라이버를 검색하여서 다운로드 받을 수 있다 내 그래픽 카드가 뭐였는지 가물가물 하면 sudo lspci -v | less 이런 걸로 찾아 볼 수 있긴한데 (요 VGA com
aisj.tistory.com
pip3 install torch torchvision torchaudio
Semantic Segmentation 사용 방법은 다음 사이트에서 확인 가능하다
https://huggingface.co/docs/transformers/tasks/semantic_segmentation
Semantic segmentation
It is common to apply some data augmentations to an image dataset to make a model more robust against overfitting. In this guide, you’ll use tf.image to randomly change the color properties of an image, but you can also use any image library you like. De
huggingface.co
This guide will show you how to:
1. Finetune SegFormer on the SceneParse150 dataset.
2. Use your finetuned model for inference.
먼저 필요한 라이브러리를 다운받자
pip install -q datasets transformers evaluate
이제 허깅페이스에 로그인을 해야하는데
먼저 라이브러리를 받고
pip install ipywidgets아래의 링크로 가서 (회원가입을 하고 로그인을 해준다)
Hugging Face – The AI community building the future.
The AI community building the future. Build, train and deploy state of the art models powered by the reference open source in machine learning.
huggingface.co
참고로 비밀 번호에 대소문자 숫자 특수기호가 포함되어야 한다

여기에서 settings를 눌러주면

여기 Access Tokens에 New token을 눌러주면 된다
참고로 이메일 인증을 해야 버튼이 활성화된다
read: tokens with this role can only be used to provide read access to repositories you could read. That includes public and private repositories that you, or an organization you’re a member of, own. Use this role if you only need to read content from the Hugging Face Hub (e.g. when downloading private models or doing inference).
write: tokens with this role additionally grant write access to the repositories you have write access to. Use this token if you need to create or push content to a repository (e.g., when training a model or modifying a model card).

write로 토큰을 생성해야 한다
토큰을 복사해서
아래의 코드를 실행시키고
from huggingface_hub import notebook_login

notebook_login()
프롬포트에 적어서 login해주자
그 다음
You’ll also want to create a dictionary that maps a label id to a label class which will be useful when you set up the model later. Download the mappings from the Hub and create the id2label and label2id dictionaries:
라고 하고
import json
from huggingface_hub import cached_download, hf_hub_url

repo_id = "huggingface/label-files"
filename = "ade20k-hf-doc-builder.json"
id2label = json.load(open(cached_download(hf_hub_url(repo_id, filename, repo_type="dataset")), "r"))
id2label = {int(k): v for k, v in id2label.items()}
label2id = {v: k for k, v in id2label.items()}
num_labels = len(id2label)
이걸로 딕셔너리를 만들 수 있다고 한다
하지만 저게 문서에서는 저렇게 나와있는데 막상 colab으로 들어가보면 filename이 바껴있다
그래서 아래를 돌려야한다
import json
from huggingface_hub import cached_download, hf_hub_url

repo_id = "huggingface/label-files"
filename = "ade20k-id2label.json"
id2label = json.load(open(cached_download(hf_hub_url(repo_id, filename, repo_type="dataset")), "r"))
id2label = {int(k): v for k, v in id2label.items()}
label2id = {v: k for k, v in id2label.items()}
num_labels = len(id2label)
여기서 num_label를 출력하면 150개 인것을 확인할 수 있다
Load SegFormer image processor
중요한 것이 background를 zero-index로 쓰냐 즉, background를 표현하냐 안하냐를 항상 구분을 해야한다
우리가 가져온 json같은 경우는 background를 포함하지 않기 때문에 reduce_labels=True옵션을 줘야한다
이렇게 되면 zero-index 는 255로 바뀌게 된다
from transformers import AutoImageProcessor

checkpoint = "nvidia/mit-b0"
image_processor = AutoImageProcessor.from_pretrained(checkpoint, reduce_labels=True)
위에서와 마찬가지로 augmentation을 진행해주고
from torchvision.transforms import ColorJitter

jitter = ColorJitter(brightness=0.25, contrast=0.25, saturation=0.25, hue=0.1)
다음 변환을 진행해줘야 한다
def train_transforms(example_batch):
    images = [jitter(x) for x in example_batch["image"]]
    labels = [x for x in example_batch["annotation"]]
    inputs = image_processor(images, labels)
    return inputs


def val_transforms(example_batch):
    images = [x for x in example_batch["image"]]
    labels = [x for x in example_batch["annotation"]]
    inputs = image_processor(images, labels)
    return inputs


train_ds.set_transform(train_transforms)
test_ds.set_transform(val_transforms)
위에 코드는 images를 pixel_values로 annotations를 labels로 바꿔 준다
또한 위에서 선언한 jitter도 적용을 해준다
test_ds의 경우는 당연히 jitter를 적용하면 안된다
Evaluate
Evaluation같은 경우는 아래의 링크에서 확인을 해서 load시키면 된다
https://huggingface.co/docs/evaluate/index
🤗 Evaluate
Using 🤗 Evaluate with other ML frameworks
huggingface.co
지금의 경우는 IoU를 적용하였다
import evaluate
metric = evaluate.load("mean_iou")
그 다음에 metrics를 이용한 계산 방법을 정의해 주자
def compute_metrics(eval_pred):
    with torch.no_grad():
        logits, labels = eval_pred
        logits_tensor = torch.from_numpy(logits)
        logits_tensor = nn.functional.interpolate(
            logits_tensor,
            size=labels.shape[-2:],
            mode="bilinear",
            align_corners=False,
        ).argmax(dim=1)

        pred_labels = logits_tensor.detach().cpu().numpy()
        metrics = metric.compute(
            predictions=pred_labels,
            references=labels,
            num_labels=num_labels,
            ignore_index=255,
            reduce_labels=False,
        )
        for key, value in metrics.items():
            if type(value) is np.ndarray:
                metrics[key] = value.tolist()
        return metrics
Your predictions need to be converted to logits first, and then reshaped to match the size of the labels before you can call compute
logit 변환은 [0, 1]의 범위를 가지는 확률을 [- ∞ \infin ∞, ∞ \infin ∞]로 바꿔주는 변환
prediction을 진행하기 전에 logit 변환을 진행해야 한다고 한다.
(이 부분은 사실 잘 모르겠다)
Train
그 다음 학습을 진행해 줘야하는데 pretraining 된 모델을 들고 올 것이다
https://huggingface.co/docs/transformers/main/en/training#finetune-with-trainer
Fine-tune a pretrained model
🤗 Transformers provides a Trainer class optimized for training 🤗 Transformers models, making it easier to start training without manually writing your own training loop. The Trainer API supports a wide range of training options and features such as l
huggingface.co
위에 링크는 튜토리얼 링크이다
학습은 Trainer를 사용한다
https://huggingface.co/docs/transformers/main/en/main_classes/trainer#transformers.Trainer
Trainer
When using gradient accumulation, one step is counted as one step with backward pass. Therefore, logging, evaluation, save will be conducted every gradient_accumulation_steps * xxx_step training examples.
huggingface.co
from transformers import AutoModelForSemanticSegmentation, TrainingArguments, Trainer
model = AutoModelForSemanticSegmentation.from_pretrained(checkpoint, id2label=id2label, label2id=label2id)
model을 가져와 주고
import torch
import torch.nn as nn
import torch.nn.functional as F

training_args = TrainingArguments(
    output_dir="segformer-b0-scene-parse-150",
    learning_rate=6e-5,
    num_train_epochs=50,
    per_device_train_batch_size=2,
    per_device_eval_batch_size=2,
    save_total_limit=3,
    evaluation_strategy="steps",
    save_strategy="steps",
    save_steps=20,
    eval_steps=20,
    logging_steps=1,
    eval_accumulation_steps=5,
    remove_unused_columns=False,
    push_to_hub=True,
)

trainer = Trainer(
    model=model,
    args=training_args,
    train_dataset=train_ds,
    eval_dataset=test_ds,
    compute_metrics=compute_metrics,
)

trainer.train()
학습을 진행해주자

만약 아래와 같은 오류가 발생하면
pip install accelerate을 통해서 다운을 받아주고 (https://pypi.org/project/accelerate/)
다음과 같은 오류에 대해서
oserror: looks like you do not have git-lfs installed, please install. you can install from https://git-lfs.github.com/. then run `git lfs install` (you only have to do this once).
https://stackoverflow.com/questions/48734119/git-lfs-is-not-a-git-command-unclear
OSError는 설치를 해줘야하는 문제여서 (https://packagecloud.io/github/git-lfs/install)
우분투의 경우
curl -s https://packagecloud.io/install/repositories/github/git-lfs/script.deb.sh | sudo bash
sudo apt-get install git-lfs
mac os의 경우
brew update
brew install git-lfs
window의 경우
https://github.com/git-lfs/git-lfs/releases
에서 해결이 가능하다
여기서 lfs는 그냥 git 에 올린파일이 대용량 파일이여서 따로 저장소를 뒀다고 생각하면 될 것 같다


성능은 썩 좋지 못한 것 같다
inference
for_test = load_dataset("scene_parse_150", split="train[:50]")
image = for_test[0]['image']

device = torch.device("cuda:0")

#device = torch.device("cuda")
#이거하면 cuda의 index 달라고 한다

#device = torch.device("cuda:0" if torch.cuda.is_available() else "cpu")  # use GPU if available, otherwise use a CPU
#이건 애초에 data가 cpu 모델이 gpu면 구동이 않되서 cuda is available이 옳지 못한것 같다

from transformers import pipeline

segmenter = pipeline("image-segmentation", model=model, image_processor=image_processor,device=device)
segmenter(image)
인퍼런스의 경우 코드를 좀 바꿨다 (그대로 실행했더니 오류가 나와가지고) -> ds[0]['image']를 가지고 노는데 애초에 ds[0]에 image가 없음
Process the image with an image processor and place the pixel_values on a GPU:
image를 똑같이 작업을 해준다음
encoding = image_processor(image, return_tensors="pt")
pixel_values = encoding.pixel_values.to(device)
모델에 넣고 logits을 뽑아낸다
outputs = model(pixel_values=pixel_values)
logits = outputs.logits.cpu()
그 다음 위에서 말한 logit을 다시 원상 복구 시켜주는 작업을 진행 (original image size로 upsampling) -> overlay하려고
upsampled_logits = nn.functional.interpolate(
    logits,
    size=image.size[::-1],
    mode="bilinear",
    align_corners=False,
)

pred_seg = upsampled_logits.argmax(dim=1)[0]
가시화
그 다음 눈으로 확인하자
import matplotlib.pyplot as plt
import numpy as np

color_seg = np.zeros((pred_seg.shape[0], pred_seg.shape[1], 3), dtype=np.uint8)
palette = np.array(create_ade20k_label_colormap())
for label, color in enumerate(palette):
    color_seg[pred_seg == label, :] = color
color_seg = color_seg[..., ::-1]  # convert to BGR

img = np.array(image) * 0.5 + color_seg * 0.5  # plot the image with the segmentation map
img = img.astype(np.uint8)

plt.figure(figsize=(15, 10))
plt.imshow(img)
plt.show()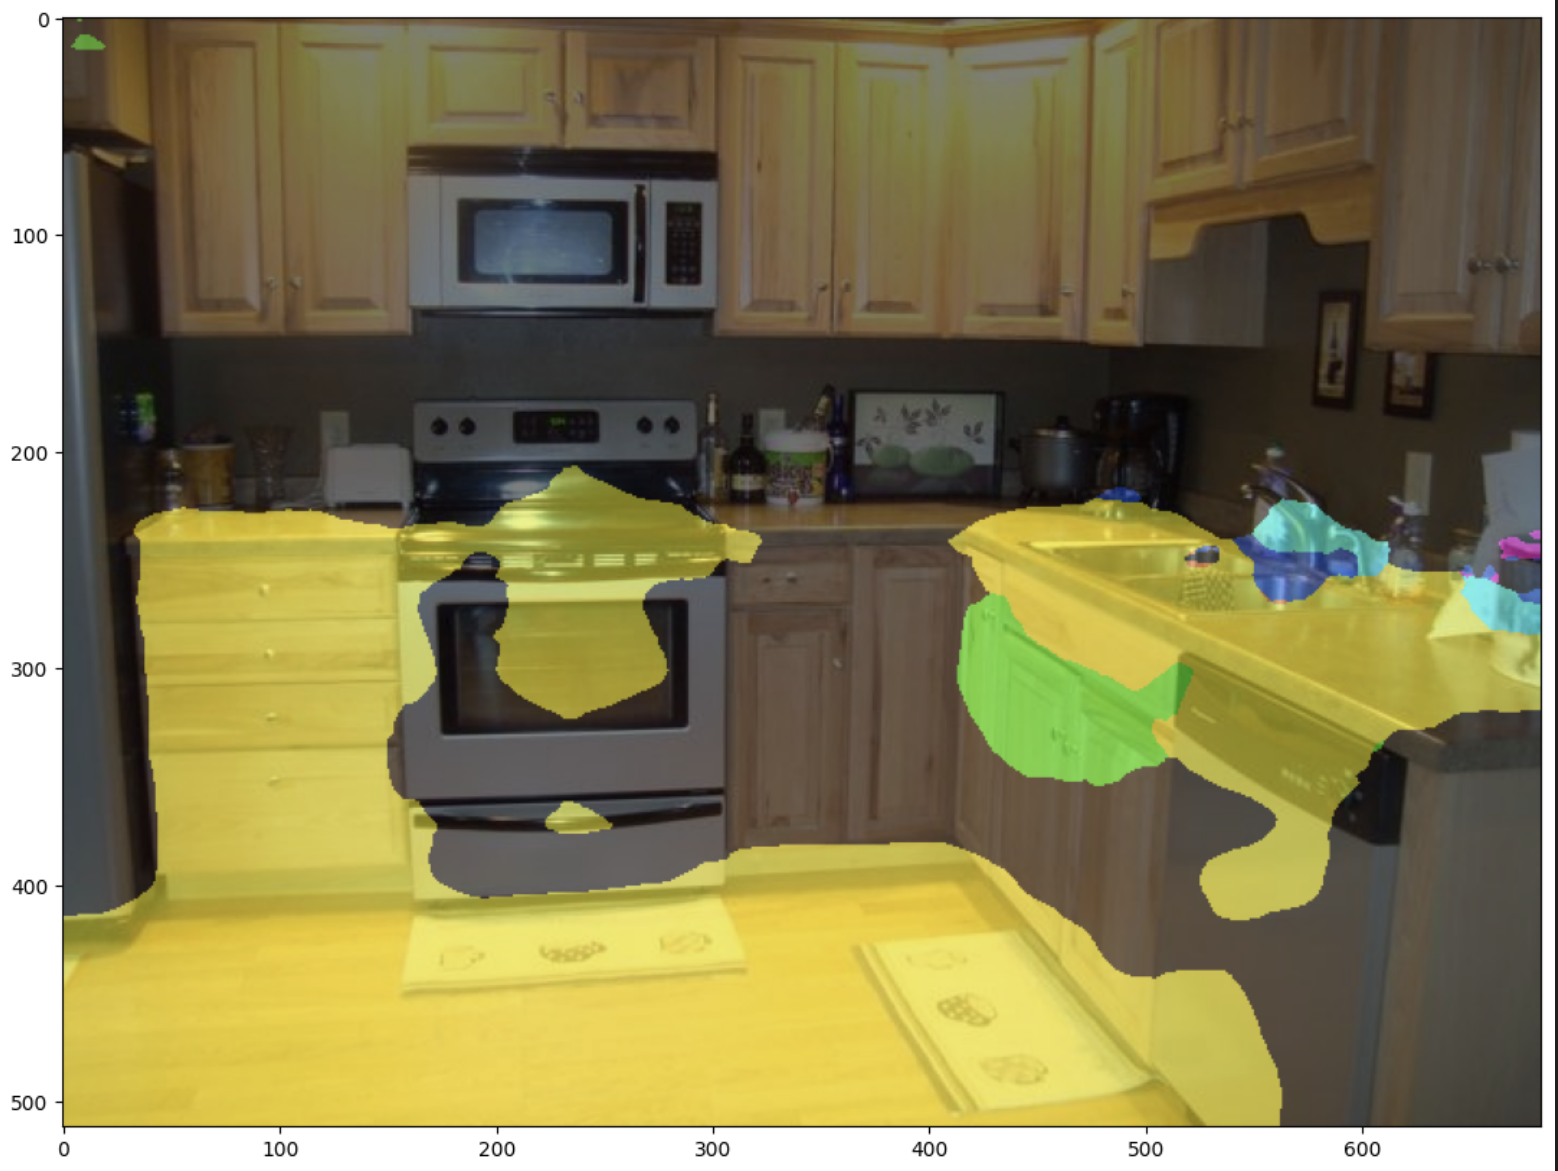

썩... 좋아보이지는 않지만 pipeline 한번 훑은 것으로 만족하자
공부 자료
< 논문 >
BEIT: BERT Pre-Training of Image Transformers
https://arxiv.org/pdf/2106.08254.pdf
beit 논문리뷰
Masked Autoencoders Are Scalable Vision Learners
https://arxiv.org/pdf/2111.06377.pdf
SELF PRE-TRAINING WITH MASKED AUTOENCODERS FOR MEDICAL IMAGE CLASSIFICATION AND SEGMENTATION
https://arxiv.org/pdf/2203.05573.pdf
<자료>
HuggingFace ::beit-base-finetuned-ade-640-640
https://huggingface.co/microsoft/beit-base-finetuned-ade-640-640
ADE20K
https://groups.csail.mit.edu/vision/datasets/ADE20K/
ADE20K Github
https://github.com/CSAILVision/ADE20K
Prepare ADE20K Dataset
https://cv.gluon.ai/build/examples_datasets/ade20k.html
Semantic Segmentation