될지 안될지 모르겠지만
공식 문서를 뜯어보자
https://www.intelrealsense.com/developers/
Developer resources for stereo depth, lidar, facial authentication and tracking project development
SDKs, resources, tutorials, code samples and downloads for Intel RealSense developers.
www.intelrealsense.com
솔직히 떡하니 Python 지원한다고 했으니 받고 해볼만 할 수도???
일단 내가 무엇을 할 수 있을지를 고민할 때 들어가려고 상품설명을 링크 걸어놓는다
https://www.intelrealsense.com/depth-camera-d455/
Introducing the Intel® RealSense™ Depth Camera D455
Twice the Range. Better Performance. IMU. Global Shutter RGB. Up to 4 m with Z-Error < 2%. On-chip calibration.
www.intelrealsense.com
python 코드 예제는 아래의 링크에서 확인 가능하다
Python
Installation GuidelinesPlease refer to installation guideline at Python InstallationBuilding from SourcePlease refer to the instructions at Building from SourceList of ExamplesThese Examples demonstrate how to use the python wrapper of the SDK.Sample code
dev.intelrealsense.com
여기에서 2번 예제인 Rendering depth and color with OpenCV and Numpy 에 끌렸다
Numpy를 통해 값을 가져올 수 있으면 충분히 처리가 가능하다고 생각하기 때문이다
추후에는 17번에 있는 TensorFlow 이용하는 것도 해보자
Rendering depth and color 코드는 생각보다 단순했다
## License: Apache 2.0. See LICENSE file in root directory.
## Copyright(c) 2015-2017 Intel Corporation. All Rights Reserved.

###############################################
##      Open CV and Numpy integration        ##
###############################################

import pyrealsense2 as rs
import numpy as np
import cv2

# Configure depth and color streams
pipeline = rs.pipeline()
config = rs.config()

# Get device product line for setting a supporting resolution
pipeline_wrapper = rs.pipeline_wrapper(pipeline)
pipeline_profile = config.resolve(pipeline_wrapper)
device = pipeline_profile.get_device()
device_product_line = str(device.get_info(rs.camera_info.product_line))

found_rgb = False
for s in device.sensors:
    if s.get_info(rs.camera_info.name) == 'RGB Camera':
        found_rgb = True
        break
if not found_rgb:
    print("The demo requires Depth camera with Color sensor")
    exit(0)

config.enable_stream(rs.stream.depth, 640, 480, rs.format.z16, 30)

if device_product_line == 'L500':
    config.enable_stream(rs.stream.color, 960, 540, rs.format.bgr8, 30)
else:
    config.enable_stream(rs.stream.color, 640, 480, rs.format.bgr8, 30)

# Start streaming
pipeline.start(config)

try:
    while True:

        # Wait for a coherent pair of frames: depth and color
        frames = pipeline.wait_for_frames()
        depth_frame = frames.get_depth_frame()
        color_frame = frames.get_color_frame()
        if not depth_frame or not color_frame:
            continue

        # Convert images to numpy arrays
        depth_image = np.asanyarray(depth_frame.get_data())
        color_image = np.asanyarray(color_frame.get_data())

        # Apply colormap on depth image (image must be converted to 8-bit per pixel first)
        depth_colormap = cv2.applyColorMap(cv2.convertScaleAbs(depth_image, alpha=0.03), cv2.COLORMAP_JET)

        depth_colormap_dim = depth_colormap.shape
        color_colormap_dim = color_image.shape

        # If depth and color resolutions are different, resize color image to match depth image for display
        if depth_colormap_dim != color_colormap_dim:
            resized_color_image = cv2.resize(color_image, dsize=(depth_colormap_dim[1], depth_colormap_dim[0]), interpolation=cv2.INTER_AREA)
            images = np.hstack((resized_color_image, depth_colormap))
        else:
            images = np.hstack((color_image, depth_colormap))

        # Show images
        cv2.namedWindow('RealSense', cv2.WINDOW_AUTOSIZE)
        cv2.imshow('RealSense', images)
        cv2.waitKey(1)

finally:

    # Stop streaming
    pipeline.stop()
솔직히 코드 뜯어보는 것보단 일단 실행해보는 타입
실행해보면
Traceback (most recent call last): File "test.py", line 18, in <module> pipeline_profile = config.resolve(pipeline_wrapper) RuntimeError: No device connected
디바이스 연결이 안되었다고 한다
아래 realsense 팀이랑 이슈 토론 한 내용을 tracking 해보자
https://github.com/IntelRealSense/librealsense/issues/11368
No device connected error / config.resolve(pipeline_wrapper) · Issue #11368 · IntelRealSense/librealsense
Required Info Camera Model D435I Firmware Version 05.14.00.00 Operating System & Version Ubuntu 20.04 Kernel Version (Linux Only) 5.9.1-rt20 Platform PC SDK Version LibRealSense v2.50.0 Language py...
github.com
위에 링크에서 위에 코드가 안돌아가면 이 코드 돌려보라고 한다 (난 이거 안됐었다.)
# First import the library
import pyrealsense2 as rs

# Create a context object. This object owns the handles to all connected realsense devices
pipeline = rs.pipeline()
pipeline.start()

try:
    while True:
        # Create a pipeline object. This object configures the streaming camera and owns it's handle
        frames = pipeline.wait_for_frames()
        depth = frames.get_depth_frame()
        if not depth: continue

        # Print a simple text-based representation of the image, by breaking it into 10x20 pixel regions and approximating the coverage of pixels within one meter
        coverage = [0]*64
        for y in range(480):
            for x in range(640):
                dist = depth.get_distance(x, y)
                if 0 < dist and dist < 1:
                    coverage[x//10] += 1

            if y%20 == 19:
                line = ""
                for c in coverage:
                    line += " .:nhBXWW"[c//25]
                coverage = [0]*64
                print(line)

finally:
    pipeline.stop()
if y%20 is 19:라고 되어 있긴 햇는데
그냥 if y%20 == 19로 바꿨다
내 결과는 질문자와 동일하게
Traceback (most recent call last): File "test_copy.py", line 6, in <module> pipeline.start() RuntimeError: No device connected
ㅋㅋㅋㅋ 가끔 두번 wrapping 되는 경우가 있다고 해서
import pyrealsense2.pyrealsense2 as rs이렇게 수정해보라고 하는데 되겠냐고
그 다음은 USB 뺐다 꼽으라고 했다
안된다
나 같은 경우에도 device를 찾지 못한다고 하여서
roscore새 터미널
roslaunch realsense2_camera rs_camera.launch새 터미널
python3 test.py했는데 질문자가 여기가 의심스럽다고 한다
After unplugging and plugging the camera back in, the script still gives the error message.
Before running any script with the camera, I used the command roslaunch realsense2_camera rs_camera.launch. After a restart of my PC and only executing the test script, there was no error. It seems that rs_camera.launch interferes at this point. I thought I need this node to access any data of the camera?
그런데 갑자기 밑에 답변듣고 해결되었다고 한다
Although your script references rospy, it is essentially a pyrealsense2 script (pyrealsense2 is the RealSense SDK's Python compatibility wrapper) and so if the pyrealsense2 wrapper is installed on your computer then the script should be able to run on its own in the librealsense SDK as a Python script without the RealSense ROS wrapper needing to be launched with
rs_camera.launch
위에서 말하기를 pyrealsense2는 RealSense SDK의 Python 호환 wrapper이여서 만약 컴퓨터에 pyrealsense2 wrapper가 설치 되어있다면 librealsense SDK에서 자체적으로 python이 실행된다고 한다
문득 궁금한거 나 pyrealsense2 있나?
dpkg --get-selections
없다... ㅠㅠㅠ
다운로드를 받아주자
https://github.com/IntelRealSense/librealsense/tree/master/wrappers/python
GitHub - IntelRealSense/librealsense: Intel® RealSense™ SDK
Intel® RealSense™ SDK. Contribute to IntelRealSense/librealsense development by creating an account on GitHub.
github.com
여기에 해답이 있을것 같다

앞에 포스팅 참고해보면 4번까지는 한거 같은데
5번이 뭔소리인지 몰라서 안했는데 아마 이부분 때문에 안되는 것 같다
이것 저것 찾아보다가
pyrealsense2 패키지는 Realsense 카메라를 Python 으로 제어할 수 있는 패키지입니다.
본 프로젝트에서는 직접 데이터를 다루기 위해 SDK 가 아닌, wrapper 를 사용합니다.
라는 말이 있다
분명 어딘가에 pyrealsense2 sdk 가 있고 pyrealsense2 wrapper 가 있을 것이다
https://github.com/IntelRealSense/librealsense/blob/master/wrappers/python/readme.md
GitHub - IntelRealSense/librealsense: Intel® RealSense™ SDK
Intel® RealSense™ SDK. Contribute to IntelRealSense/librealsense development by creating an account on GitHub.
github.com
kist@kist-MS-7D96:~/catkin_ws$ pip install pyrealsense2
Requirement already satisfied: pyrealsense2 in /home/kist/.local/lib/python3.8/site-packages (2.53.1.4623)
나 했었구나
https://booiljung.github.io/technical_articles/c_language/build_cmake_in_vscode_on_linux.html
https://booiljung.github.io/technical_articles/c_language/build_cmake_in_vscode_on_linux.html
Top Up VSCode로 CMake로 빌드 하고 디버깅 하기 2019년 3월 3일 작성 첫 C 프로그램은 아마도 Turbo-C 2.0 으로 작성하였습니다. 이후 쏠라리스에서 vi를 사용하여 MUD를 개발하거나, 임베디드 개발을 위해 M
booiljung.github.io
프로젝트를 빌드하는 법이라고 한다
뭐 어려운말은 빼고 5번엔 Alternatively 라고 되어있으므로 4번만 제대로 되었다면 상관 없을 것 같다
export PYTHONPATH=$PYTHONPATH:/usr/local/lib이걸 그냥 터미널에 적었는데 그게 아니라 환경변수에 추가해야한다
vim ~/.bashrc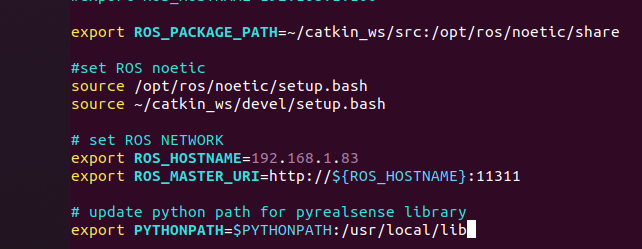
다음과 같이 추가해주고 저장해준다
그리곤 갱신
source ~/.bashrc
librealsense2.so는 잘들어가 있는데 pyrealsense2.so는 안보인다

여기에 있다
이걸 우짠담....
https://github.com/IntelRealSense/librealsense/issues/8996
pyrealsense2.so cannot open shared object file : No such file or directory · Issue #8996 · IntelRealSense/librealsense
Before opening a new issue, we wanted to provide you with some useful suggestions (Click "Preview" above for a better view): Consider checking out SDK examples. Have you looked in our documentation...
github.com
다음 이슈를 참고해보자
May I confirm that you have placed the files librealsense2.so and your exotically-named pyrealsense2.so file (e.g
pyrealsense2.cpython-35m-arm-linux-gnueabihf.so) into the same folder as the one that your
realsense_depth.py script is in? That folder seems to be
home/nvidia/librealsense/build
참고로 질문자 실행 파일이 realsense_depth.py 이다
대충 libsense2.so 랑 pyrealsense2.so 처럼 보이는 것 같은 파일에 다 때려 박았다

추가로 지금 상황은

위에 2번 예제는 돌아갔는데 (좌표랑 rgb값도 잘 가져온다)
함 돌려보라는 코드가
Traceback (most recent call last): File "test_copy.py", line 11, in <module> frames = pipeline.wait_for_frames() RuntimeError: Frame didn't arrive within 5000
인 상태이다
지금 오류가 나는 코드는 다음과 같다
# First import the library
import pyrealsense2 as rs

# Create a context object. This object owns the handles to all connected realsense devices
pipeline = rs.pipeline()
pipeline.start()


try:
    while True:
        # Create a pipeline object. This object configures the streaming camera and owns it's handle
        frames = pipeline.wait_for_frames()
        depth = frames.get_depth_frame()
        if not depth: continue

        # Print a simple text-based representation of the image, by breaking it into 10x20 pixel regions and approximating the coverage of pixels within one meter
        coverage = [0]*64
        for y in range(480):
            for x in range(640):
                dist = depth.get_distance(x, y)
                if 0 < dist and dist < 1:
                    coverage[x//10] += 1

            if y%20 == 19:
                line = ""
                for c in coverage:
                    line += " .:nhBXWW"[c//25]
                coverage = [0]*64
                print(line)

finally:
    pipeline.stop()
하지만 다음 공식문서의 예제를 확인해보면
## License: Apache 2.0. See LICENSE file in root directory.
## Copyright(c) 2015-2017 Intel Corporation. All Rights Reserved.

#####################################################
## librealsense tutorial #1 - Accessing depth data ##
#####################################################

# First import the library
import pyrealsense2 as rs

try:
    # Create a context object. This object owns the handles to all connected realsense devices
    pipeline = rs.pipeline()

    # Configure streams
    config = rs.config()
    config.enable_stream(rs.stream.depth, 640, 480, rs.format.z16, 30)

    # Start streaming
    pipeline.start(config)

    while True:
        # This call waits until a new coherent set of frames is available on a device
        # Calls to get_frame_data(...) and get_frame_timestamp(...) on a device will return stable values until wait_for_frames(...) is called
        frames = pipeline.wait_for_frames()
        depth = frames.get_depth_frame()
        if not depth: continue

        # Print a simple text-based representation of the image, by breaking it into 10x20 pixel regions and approximating the coverage of pixels within one meter
        coverage = [0]*64
        for y in range(480):
            for x in range(640):
                dist = depth.get_distance(x, y)
                if 0 < dist and dist < 1:
                    coverage[x//10] += 1

            if y%20 is 19:
                line = ""
                for c in coverage:
                    line += " .:nhBXWW"[c//25]
                coverage = [0]*64
                print(line)
    exit(0)
#except rs.error as e:
#    # Method calls agaisnt librealsense objects may throw exceptions of type pylibrs.error
#    print("pylibrs.error was thrown when calling %s(%s):\n", % (e.get_failed_function(), e.get_failed_args()))
#    print("    %s\n", e.what())
#    exit(1)
except Exception as e:
    print(e)
    pass
비슷한 코드 같지만 조금 코드가 더 길다
(바로 위에 코드는 정상적으로 작동한다)
이둘의 차이는 다음 네 줄이다
# Create a context object. This object owns the handles to all connected realsense devices
pipeline = rs.pipeline()

# Configure streams
config = rs.config()
config.enable_stream(rs.stream.depth, 640, 480, rs.format.z16, 30)

# Start streaming
pipeline.start(config)
즉, config 가 없으면 장치를 불러올 수가 없다는 뜻이다
결론적으로 해결한 코드는 다음과 같다
# First import the library
import pyrealsense2 as rs

# Create a context object. This object owns the handles to all connected realsense devices
pipeline = rs.pipeline()

### adding myself ###
config = rs.config()
config.enable_stream(rs.stream.depth, 640, 480, rs.format.z16, 30)

### convert myself ###
#pipeline.start()
pipeline.start(config)

try:
    while True:
        # Create a pipeline object. This object configures the streaming camera and owns it's handle
        frames = pipeline.wait_for_frames()
        depth = frames.get_depth_frame()
        if not depth: continue

        # Print a simple text-based representation of the image, by breaking it into 10x20 pixel regions and approximating the coverage of pixels within one meter
        coverage = [0]*64
        for y in range(480):
            for x in range(640):
                dist = depth.get_distance(x, y)
                if 0 < dist and dist < 1:
                    coverage[x//10] += 1

            if y%20 == 19:
                line = ""
                for c in coverage:
                    line += " .:nhBXWW"[c//25]
                coverage = [0]*64
                #print(line)

finally:
    pipeline.stop()
그렇다면 config 의 역할을 무엇일까??
rs.config()
다음 공식문서를 확인해보면
The config allows pipeline users to request filters for the pipeline streams and device selection and configuration
파이프라인 사용자가 파이프라인 스트림, 장치 선택 및 구성을 위한 필터를 요청하도록 한다.
공식문서에서는 optional 한 step이라고 하지만 이부분 때문에 문제가 생겼다
원래는 파이프라인이 스트리밍 장치를 내부적으로 해결하기 때문에 꼭 할 필요는 없다고 하지만...
그래서 하는 역할은
사용자가 구성 필터와 파이프라인에 일치하는 장치를 찾아 장치를 명시적으로 선택하고
스트리밍이 시작되기 전에 해당 제어를 수정할 수 있도록 해준다
can_resolve config가 configuration 필터를 해석하여 알맞는 자이치 및 스트림 프로파일을 찾았는지 확인
(self: pyrealsense2.config, p: pyrealsense2.pipeline_wrapper) -> return bool
disable_all_streams 모든 장치를 명확히 disable
(self: pyrealsense2.config) → None
disable_stream 장치를 명확히 disable
(self: pyrealsense2.config, stream: pyrealsense2.stream, index: int=-1) → None
enable_all_streams (self: pyrealsense2.config) → None
enable_device pipeline에 사용될 디바이스를 serial number를 통해 지정
(self: pyrealsense2.config, serial: str) → None
enable_device_from_file file로부터 pipeline에 사용될 recorded device를 선정
(self: pyrealsense2.config, file_name: str, repeat_playback: bool=True) → None
enable_record_to_file 찾아낸 장치가 파일로 기록하도록 요청
(self: pyrealsense2.config, file_name: str) → None
enable_stream overloaded 함수
resolve configuration 필터를 해석
(self: pyrealsense2.config, p: pyrealsense2.pipeline_wrapper) → pyrealsense2.pipeline_profile
다음과 같은 메소드를 이용할 수 있고 예시는 다음과 같다
import pyrealsense2 as rs
pipeline = rs.pipeline()
config = rs.config()

pipeline_wrapper = rs.pipeline_wrapper(pipeline)
config.enable_stream(rs.stream.depth, 640, 480, rs.format.z16, 30)
pipeline.start(config)

flag = rs.config().can_resolve(pipeline_wrapper)
print(flag)

pipeline.stop()
Depth camera 확인 & depth, RGB 정보 받아오기
이렇게 확인을 하고 depth camera가 잘 작동하는지 혹은 depth 정보나 RGB정보를 한번에 numpy로 가져오려면
아래의 코드를 실행시키면 된다
'''depth 캠이 잘 연결되었는지 확인하는 코드'''

## License: Apache 2.0. See LICENSE file in root directory.
## Copyright(c) 2015-2017 Intel Corporation. All Rights Reserved.

###############################################
##      Open CV and Numpy integration        ##
###############################################

import pyrealsense2 as rs
import numpy as np
import cv2

# Configure depth and color streams
pipeline = rs.pipeline()
config = rs.config()

# Get device product line for setting a supporting resolution
pipeline_wrapper = rs.pipeline_wrapper(pipeline)
pipeline_profile = config.resolve(pipeline_wrapper)
device = pipeline_profile.get_device()
device_product_line = str(device.get_info(rs.camera_info.product_line))
print("Running device product line : %s "%device_product_line)
cf_flag = rs.config().can_resolve(pipeline_wrapper)
print(cf_flag)
print("camera setting is already %s" %cf_flag is True)
found_rgb = False
for s in device.sensors:
    if s.get_info(rs.camera_info.name) == 'RGB Camera':
        found_rgb = True
        break
if not found_rgb:
    print("The demo requires Depth camera with Color sensor")
    exit(0)

config.enable_stream(rs.stream.depth, 640, 480, rs.format.z16, 30)

if device_product_line == 'L500':
    config.enable_stream(rs.stream.color, 960, 540, rs.format.bgr8, 30)
else:
    config.enable_stream(rs.stream.color, 640, 480, rs.format.bgr8, 30)

# Start streaming
pipeline.start(config)

try:
    while True:

        # Wait for a coherent pair of frames: depth and color
        frames = pipeline.wait_for_frames()
        depth_frame = frames.get_depth_frame()
        color_frame = frames.get_color_frame()
        print((depth_frame))
        if not depth_frame or not color_frame:
            continue

        # Convert images to numpy arrays
        depth_image = np.asanyarray(depth_frame.get_data())
        #print(sum(depth_image))
        color_image = np.asanyarray(color_frame.get_data())
        #print(color_image)
        # Apply colormap on depth image (image must be converted to 8-bit per pixel first)
        depth_colormap = cv2.applyColorMap(cv2.convertScaleAbs(depth_image, alpha=0.03), cv2.COLORMAP_JET)

        depth_colormap_dim = depth_colormap.shape
        color_colormap_dim = color_image.shape

        # If depth and color resolutions are different, resize color image to match depth image for display
        if depth_colormap_dim != color_colormap_dim:
            resized_color_image = cv2.resize(color_image, dsize=(depth_colormap_dim[1], depth_colormap_dim[0]), interpolation=cv2.INTER_AREA)
            images = np.hstack((resized_color_image, depth_colormap))
        else:
            images = np.hstack((color_image, depth_colormap))

        # Show images
        cv2.namedWindow('RealSense', cv2.WINDOW_AUTOSIZE)
        cv2.imshow('RealSense', images)
        if cv2.waitKey(1) & 0xFF == ord('q'):
            break


finally:
    # Stop streaming
    pipeline.stop()
Error Shooting
Traceback (most recent call last): File "test_copy.py", line 13, in <module> pipeline.start(config) RuntimeError: xioctl(VIDIOC_S_FMT) failed, errno=16 Last Error: Device or resource busy
https://github.com/IntelRealSense/librealsense/issues/1828
This problem occurs when the device is really busy now, I means that there are several occasions it will be busy:
ㅋㅋ 진짜로 바쁠 때 발생한다고 한다
다음 코드
ps를 통해서 현재 실행되고 있는 프로세스를 확인해준다

지금 연결되어있는 카메라 USB 확인
rs-enumerate-devices사실 위에 방법을 봐도 찾지를 못해서
있는 터미널 다 닫고 다시 터미널 하나만 띄워서 실행 시켰더니 잘 해결되었다
'통신 Study > ROS' 카테고리의 다른 글
| [Robotics] ROS 다운로드 및 환경 설정(+python 예제 코드) (0) | 2023.05.18 |
|---|---|
| [Robotics] Real sense 공부하는 자료들 + .ROS + 해야할거 + 질문 (0) | 2023.04.07 |
| [Robotics] Depth Camera Rviz 띄워보기 (0) | 2023.04.06 |
| [Robotics] Intel® RealSense™ Depth Camera D455 (0) | 2023.04.05 |
| [Robotics] ROS를 이용한 Publisher/Subscriber (0) | 2023.03.28 |


