출력을 좀 더 보기 쉽게 하기 위해서 조금 꾸며주려고 한다
Print 문
%이용하기
%d : 숫자 데이터
%s : 문자열 데이터
%c : 문자 하나 데이터
이걸로 싱글 벙글하면서 다 만들었는데
계속 TypeError가 나서 보니깐
rosinfo는 String만 지원이 가능한 것 같다
그래서 다음과 같이 바꿨다
state_name = ["length" , "adult/child" , "bookcase_num" , "count" , "sceinaro"]
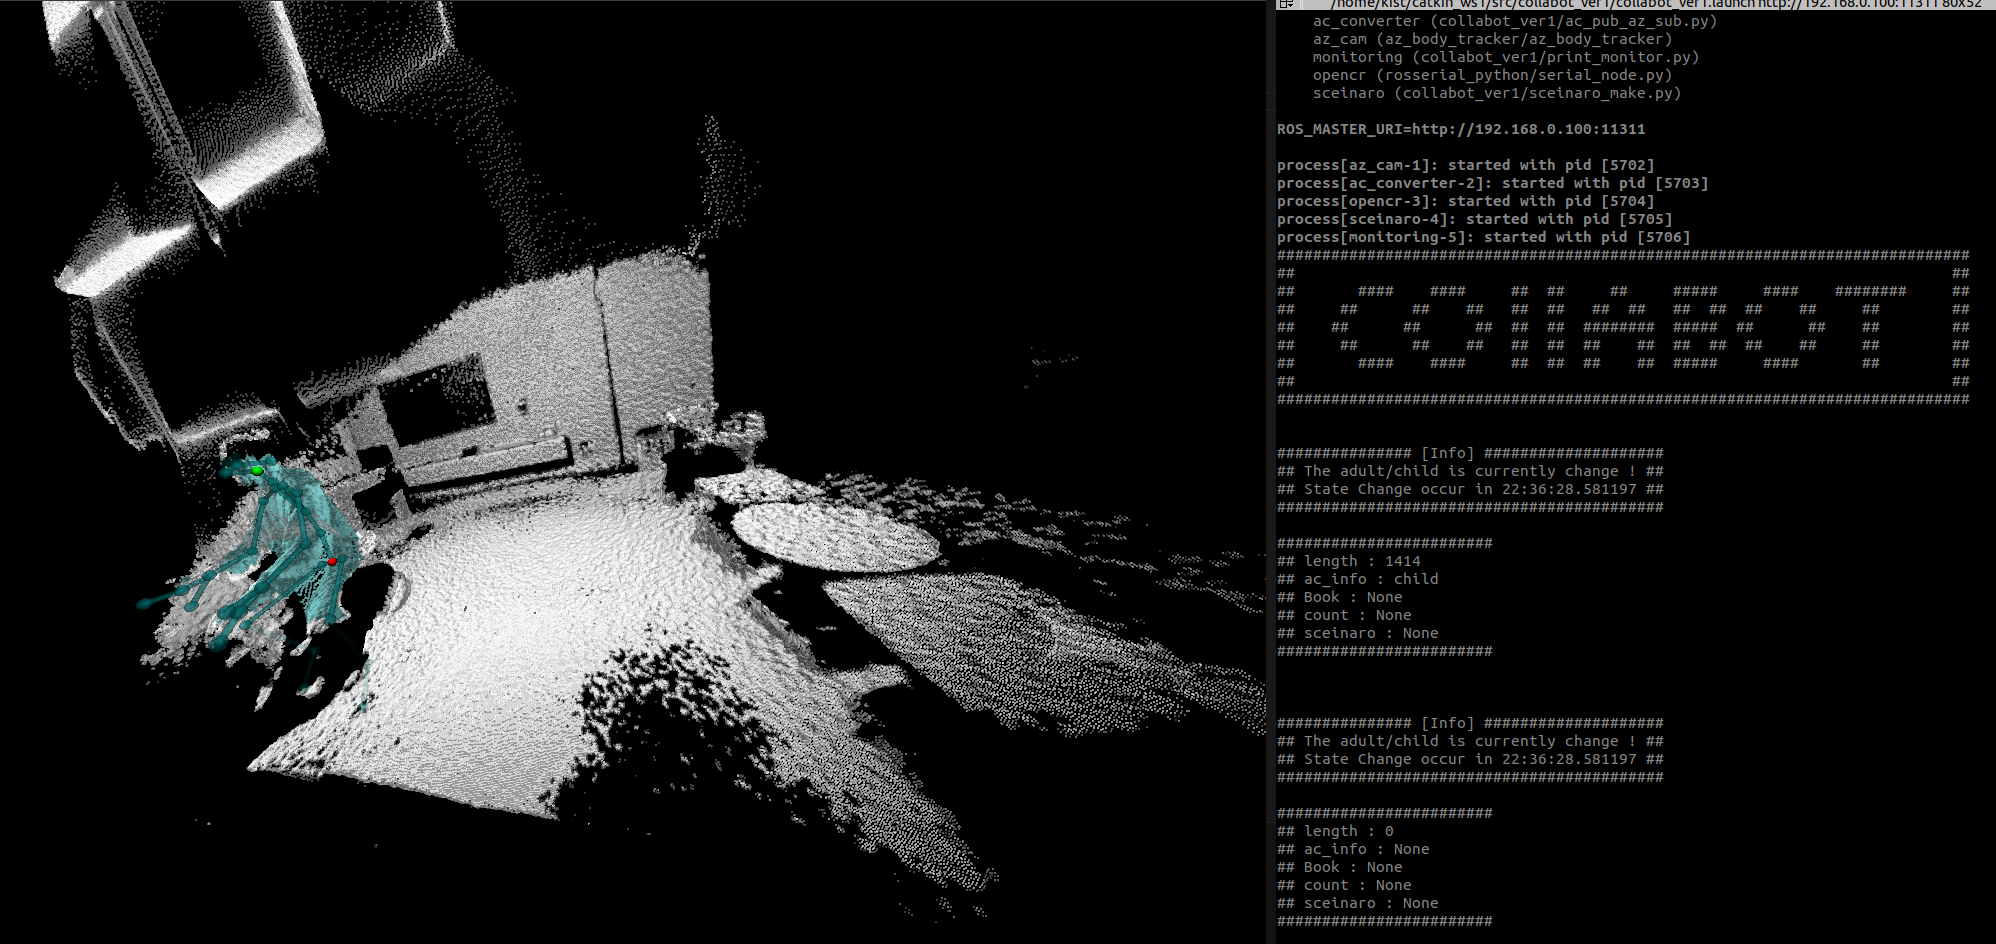
rospy.loginfo("############### [Info] ####################")
rospy.loginfo("## The %s is currently change ! ##" %state_name[idx])
rospy.loginfo("## State Change occur in %s ##" %str(now.time()))
rospy.loginfo("########################################### \n")
rospy.loginfo("########################")
rospy.loginfo("## length : %s " %str(int(self.status[0])))
rospy.loginfo("## ac_info : %s " %self.status[1])
rospy.loginfo("## Book : %s " %self.status[2])
rospy.loginfo("## count : %s " %str(self.status[3]))
rospy.loginfo("## sceinaro : %s " %str(self.status[4]))
rospy.loginfo("######################## \n\n\n")
여기서 조금 신기해보이는 now.time()이 있다
현재 시간 출력하기
from datetime import datetime

now = datetime.now()
rospy.loginfo("## State Change occur in %s ##" %str(now.time()))
다음과 같이 datetime 라이브러리를 import 시키고
datetime.now()가 조금 길어서 새로운 변수에 할당한다
print("현재 : ", now)
print("현재 날짜 : ", now.date())
print("현재 시간 : ", now.time())
print("timestamp : ", now.timestamp())
print("년 : ", now.year)
print("월 : ", now.month)
print("일 : ", now.day)
print("시 : ", now.hour)
print("분 : ", now.minute)
print("초 : ", now.second)
print("마이크로초 : ", now.microsecond)
print("요일 : ", now.weekday())
print("문자열 변환 : ", now.strftime('%Y-%m-%d %H:%M:%S'))
# Output
# 현재 : <module 'time' (built-in)>
# 현재 : time.struct_time(tm_year=2021, tm_mon=12, tm_mday=22, tm_hour=15, tm_min=47, tm_sec=51, tm_wday=2, tm_yday=356, tm_isdst=0)
# timestamp : 1640155671.267509
# 년 : 2021
# 월 : 12
# 일 : 22
# 시 : 15
# 분 : 47
# 초 : 51
# 요일 : 2
# 올해로부터 경과된 일 : 356
# 문자열 변환 : 2021-12-22 15:47:51
자세한 것은 아래의 블로그를 참고 하였다
https://jsikim1.tistory.com/215
Python 현재 날짜, 현재 시간 구하는 2가지 방법 (datetime, time)
Python 현재 날짜, 현재 시간 구하는 2가지 방법 (datetime, time) Python에서 현재 날짜, 현재 시간을 얻는 방법 2가지를 알려드리도록 하겠습니다. 2가지 방법은 아래와 같습니다. datetime 사용 time 사용
jsikim1.tistory.com
이걸 roslaunch를 통해서 실행시켜보고 싶었다
print문 roslaunch에 띄우기
또한 loginfo가 아닌 print문을 이용하고 싶었다
http://wiki.ros.org/roslaunch/XML/node
roslaunch/XML/node - ROS Wiki
tag The tag specifies a ROS node that you wish to have launched. This is the most common roslaunch tag as it supports the most important features: bringing up and taking down nodes. roslaunch does not provide any guarantees about what order nodes start in.
wiki.ros.org
공식문서를 들어간 다음 딱봐도 내가 필요한 부분을 보자

stdout/stderr 가 screen에 보여준다고 한다 이게 뭔가 print문 뜻하는 것 같다
위에 pkg, type, name 을 Attributes라고 설명하는 것을 보니 XML < >안에 수정하면 될 것 같았다
굳이 print문을 고집하려 하는게 이거 말고 나머지 실행파일들을 rosinfo로 짰는데
launch가 한번에 실행해서 지저분할 거 같아서 구분을 짓고자 이렇게 하였다
<node pkg= "collabot_ver1" type="print_monitor.py" name="print_Screen"/ output="screen">이렇게 하면 되지 않을까?
ㅇㅇ 잘 된다
node 안에 attribute로 들어가니 상관 없지 않나 하지만
옆에 INFO로 숫자 안뜨고 싶어서 한것도 있다
'프로젝트 모음 > HRI ROS Project' 카테고리의 다른 글
| [Robotics][Proj 18] Segmentation 모델(mmsegmentation) 준비 및 적용 (0) | 2023.06.27 |
|---|---|
| [Robotics][Proj 17] semantic segmentation 예제 연습 (1) | 2023.06.09 |
| [Robotics][Proj 15] Raspberry pi CLI 환경 고정IP (0) | 2023.05.23 |
| [Robotics][Proj 14] Roslaunch로 Rosrun 묶기 (0) | 2023.05.19 |
| [Robotics][Proj 13] 노트북과 OpenCR연결 & 통신 (1) | 2023.05.15 |


