일단 구상하고 있는 아이디어에 사용되는 데이터는
모델 : BEiT (https://arxiv.org/pdf/2106.08254.pdf)
데이터 : ADE20K(https://github.com/CSAILVision/ADE20K/tree/main) 이다
BEiT for ADE20K를 사용하기 위해서는 mmsegmentation Framework를 이용하려 한다

이 Backbone을 이용하고 싶어서
MMsegmentation을 이용하고자 한다
0. Installation
다음 공식 레포를 따라서 install을 진행한다
https://github.com/open-mmlab/mmsegmentation/blob/main/docs/en/get_started.md
GitHub - open-mmlab/mmsegmentation: OpenMMLab Semantic Segmentation Toolbox and Benchmark.
OpenMMLab Semantic Segmentation Toolbox and Benchmark. - GitHub - open-mmlab/mmsegmentation: OpenMMLab Semantic Segmentation Toolbox and Benchmark.
github.com
conda create --name mmseg python=3.8 -y
conda activate mmseg
pytorch는 본인의 환경에 맞게 설치(https://pytorch.org/get-started/locally/)

그 다음 mmcv 와 openmim을 설치
pip install -U openmim
mim install mmengine
mim install "mmcv>=2.0.0"
그 다음 mmseg를 사용하기 위해 github를 clone 주자 (환경세팅을 위한 pip install -v -e .)
git clone -b main https://github.com/open-mmlab/mmsegmentation.git
cd mmsegmentation
pip install -v -e .
# '-v' means verbose, or more output
# '-e' means installing a project in editable mode,
# thus any local modifications made to the code will take effect without reinstallation.
1. dataset 준비
다음 레포에 있는데로
데이터 셋을 위치시키자

공식에서 신청해서 다운로드 받으라하고
It is recommended to symlink the dataset root to
$MMSEGMENTATION/data
. If your folder structure is different, you may need to change the corresponding paths in config files.
라고 하니 data라는 디렉토리를 만든다음 그안에 다운 받은 데이터 셋을 넣었다

2. 설치 확인
다음 코드로 빠르게 돌려보자()
from mmseg.apis import MMSegInferencer
# Load models into memory
inferencer = MMSegInferencer(model='deeplabv3plus_r18-d8_4xb2-80k_cityscapes-512x1024')
# Inference
inferencer('../demo/demo.png', show=True)
위에 코드를 mmsegmentation/practice/prac1.py 에 넣어서 실행시켰다

이거 나오면 성공
어? 이러면 ~ 하고 기대감에 아래의 사진을 넣은 결과


모델의 pth를 직접 받아주고
(https://conversationhub.blob.core.windows.net/beit-share-public/beit/beit_base_patch16_224_pt22k_ft22k.pth?sv=2021-10-04&st=2023-06-08T11%3A16%3A02Z&se=2033-06-09T11%3A16%3A00Z&sr=c&sp=r&sig=N4pfCVmSeq4L4tS8QbrFVsX6f6q844eft8xSuXdxU48%3D)

이걸 받아줬다.
https://github.com/microsoft/unilm/blob/master/beit/README.md
GitHub - microsoft/unilm: Large-scale Self-supervised Pre-training Across Tasks, Languages, and Modalities
Large-scale Self-supervised Pre-training Across Tasks, Languages, and Modalities - GitHub - microsoft/unilm: Large-scale Self-supervised Pre-training Across Tasks, Languages, and Modalities
github.com
그 다음 아래의 명령어를 돌려주는데
python tools/model_converters/beit2mmseg.py ${PRETRAIN_PATH} ${STORE_PATH}
python tools/model_converters/beit2mmseg.py download_pth/upernet_beit-base_8x2_640x640_160k_ade20k-eead221d.pth pretrain/beit_base_patch16_224_pt22k_ft22k.pth
공식레포인 아래의 링크 를 MMseg로 바꿔준 것이라고 한다
https://github.com/microsoft/unilm/tree/master/beit/semantic_segmentation

이러면 pretrain 디렉토리에 pth가 만들어진다.
3. Training
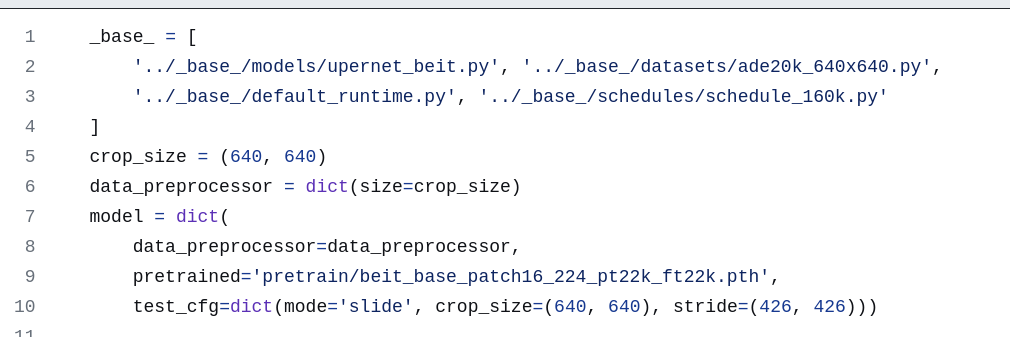
다음 레포를 참고해서 다음의 명령어를 돌렸다
https://github.com/open-mmlab/mmsegmentation/blob/main/docs/en/user_guides/4_train_test.md
python tools/train.py configs/beit/beit-base_upernet_8xb2-160k_ade20k-640x640.py --resume --cfg-options load_from=pretrain/beit_base_patch16_224_pt22k_ft22k.pth당연하게도 다음과 같은 에러가 나온다
FileNotFoundError: class `IterBasedTrainLoop` in mmengine/runner/loops.py: class `ADE20KDataset` in mmseg/datasets/ade.py: [Errno 2] No such file or directory: 'data/ade/ADEChallengeData2016/images/training'
아까 mmsegmentation/data/ADE20K_2021_17_01 만들었던 것을 조금 수정해 주자
구조는 얼추 비슷히니 일단 ade를 만든 다음 복사 붙여넣기 하고 위에 구조대로 만들어 주자

돌려보면 얼추 돌아가고 다음과 같은 에러를 뱉는다
keyerror: 'meta'
pth에 meta 가 없는 오류로 위에서 받을때 initialized weight를 받아서 그렇다 그래서 weight를 눌러서 다시 다운 받으면
정상적으로 돌아가다가 다음과 같은 에러가 나온다
KeyError: 'backbone.blocks.0.attn.relative_position_bias_table'

이건 pth가 잘못되었음 (내가 돌린 코드랑 pth 랑 구조가 다르다)를 알 수있다
뭔가 잘못되었음을 느끼고 코드를 살펴보면
Beit는 이렇게 따로 pth를 가공해야하지만
swin의 경우는

그냥 코드 자체에서 다운로드 하는 것을 볼 수 있다
그래서 Swin의 경우 아래와 같이
python tools/train.py <config_file>
python tools/train.py configs/swin/swin-base-patch4-window7-in22k-pre_upernet_8xb2-160k_ade20k-512x512.py
이런 식으로 실행이 가능하다
하지만 위의 방식을 따라 했다면 다음과 같은 오류가 날 것인데

FileNotFoundError: [Errno 2] No such file or directory: 'data/ade/ADEChallengeData2016/annotations/training/unclassified/misc/ADE_train_00012868.png'
이거는 우리가 ade를 쓰긴 했지만 구조가 다르기 때문에 발 생하는 문제이다
이건 파이썬으로 구현이 가능하긴 하지만 이때 든 생각이
애초에 Beit 가 ADE20K기반으로 pretrained 되어 있는 weight를 공개했는데
이걸 다시 ADE20K로 학습을 왜 하려했지라는 생각이 들었다
그래서 그냥 Inference를 진행했고
아래의 링크를 참고하여서 다음코드를 구성했다
https://mmsegmentation.readthedocs.io/en/latest/user_guides/3_inference.html
from mmseg.apis import MMSegInferencer
# Load models into memory
inferencer = MMSegInferencer(model='beit-base_upernet_8xb2-160k_ade20k-640x640')
# Inference
inferencer('/home/kist/Collabot/mmsegmentation/demo/demo3.png', show=True)

# result is a `dict` including 2 keys 'visualization' and 'predictions'
결과는 몇일 간의 삽질을 무시하듯

잘 나오네....
'프로젝트 모음 > HRI ROS Project' 카테고리의 다른 글
| [Robotics][Proj 19] Structural Similarity Index Measure 정리 및 적용 (0) | 2023.07.12 |
|---|---|
| [Robotics][Proj 17] semantic segmentation 예제 연습 (1) | 2023.06.09 |
| [Robotics][Proj 16] Print 문 커스텀 (0) | 2023.05.25 |
| [Robotics][Proj 15] Raspberry pi CLI 환경 고정IP (0) | 2023.05.23 |
| [Robotics][Proj 14] Roslaunch로 Rosrun 묶기 (0) | 2023.05.19 |


